Right Click Options
Dec 26, 2025

Context Menu (Right-Click) – Timeline Editing Options
This section describes all functions available when right-clicking on the timeline in OSC⚡See. These options provide advanced tools to edit, reorganize, synchronize, and exchange marker and command data efficiently.
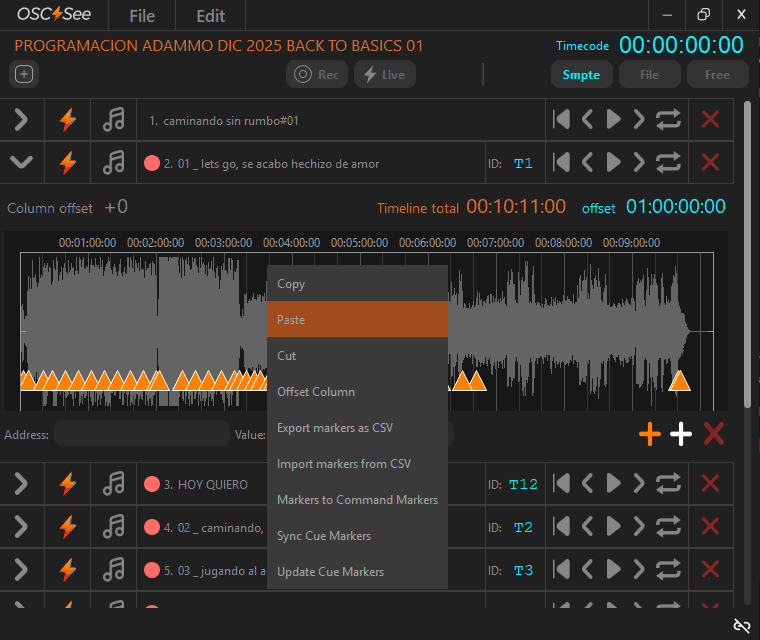
1. Copy / Paste / Cut
These are standard timeline editing operations:
Copy: Copies the selected keyframes, commands, or markers.
Paste: Pastes the copied content at the current timeline cursor position.
Cut: Removes the selected content from its original position and places it in the clipboard.
These functions behave consistently with common timeline-based editing software.
2. Offset Column
Offset Column allows you to permanently modify the column index value of the selected keyframes or commands.
How it works:
When selected, a dialog appears allowing the user to enter an offset value:
Positive values (e.g.
+10,+20)Negative values (e.g.
-1,-5)
The entered value is added to or subtracted from the existing column number of each selected item.
Key difference vs Track Column Offset:
Offset Column (Context Menu)
Affects only the selected values
Applies a permanent (destructive) edit
Track Column Offset
Affects all values in the track
Applies a temporary, non-destructive offset
This feature is especially useful when reorganizing recorded Resolume commands without re-recording them.
3. Export Markers as CSV
This option exports the selected markers to a CSV file.
Export options:
When this function is triggered, a contextual dialog appears asking which markers should be exported:
Command Markers+ only
Standard Markers only
Both (Command Markers+ and Standard Markers)
This allows precise control over the exported data, depending on whether the user needs executable markers, reference annotations, or a complete marker set.
Exported CSV content:
Timecode for each exported marker
Marker text / label
Marker type (Standard or Command Markers+)
Typical use cases:
Exchanging executable markers between OSC⚡See projects
Exporting annotation markers for documentation or review
Exporting markers for use in other software or systems, such as lighting consoles, laser systems, show control software, or other timecode-based platforms, allowing programmers in different departments to reuse the timing structure in independent projects.
The exported markers reflect the exact state of the timeline at the moment of export.
4. Import Markers from CSV
Allows importing markers from an external CSV file.
Import process:
When importing, OSC⚡See displays a configuration dialog where the user must specify:
Which CSV column contains the marker text
Which CSV column contains the timecode
This flexibility allows OSC⚡See to work with non-standard CSV formats generated by DAWs, spreadsheets, or other marker-based systems.
5. Markers to Command Markers+
Converts standard markers into Command Markers+ (executable markers).
Primary use case:
This function is particularly useful when:
Markers are imported from a CSV file
Markers are initially text-only annotations
The user wants to turn them into executable and synchronizable markers
Once converted, Command Markers+ can:
Execute commands
Be synchronized with Resolume using labels / tags
Participate in Cue synchronization workflows
6. Sync Cue Markers
This option synchronizes Cue Markers between OSC⚡See and Resolume.
Synchronization workflow:
OSC⚡See connects to Resolume.
A dialog prompts the user to select:
The starting column number for marker creation.
Cue Markers are created sequentially:
Example:
3 Cue Markers starting at column 10 → columns 10, 11, and 12
OSC⚡See automatically generates a Track ID:
This ID can be manually edited if needed.
The Traffic Light system activates to verify synchronization status.
Traffic Light (Status Indicator):
The Traffic Light indicates:
Successfully matched markers
Duplicate markers
Missing markers
Note:
Column scanning is performed at controlled intervals to avoid saturating OSC communication with Resolume.
After the initial sync, it is recommended to wait 1–2 minutes for the status to fully stabilize.
7. Update Cue Markers
This function performs a re-synchronization of missing Cue Markers.
Typical scenarios:
Cue Markers manually deleted in Resolume
New markers added in OSC⚡See after the initial sync
Project modifications requiring reconciliation
How it works:
OSC⚡See detects which Cue Markers are missing.
A dialog prompts the user to choose:
The starting column number for regeneration.
OSC⚡See creates:
One column if one marker is missing
Multiple columns if multiple markers are missing
The Traffic Light system re-verifies overall synchronization status.
This process restores missing markers without duplicating those already present.