Tips and Tricks
Dec 5, 2025

Tips and Tricks
Markers
White “+” vs Orange “+”
White “+” = standard marker (label). Orange “+” = Command-Marker+ (command-capable for Resolume).*at start toggles command mode on/off. A full OSC path turns the marker into a direct OSC command.
Custom Address creation
Wildcard
*in OSC paths
In OSC Addresses,*matches any numeric index between slashes (e.g.,/layers/*/clips/*/opacity). Works when recording and sending.
Multitrack
Multitrack Mode (LTC SMPTE)
Activates all tracks simultaneously under timecode (Live mode).
Warning shown in-app:By enable this option, only Live Mode and the SMTE source can be used. Rec Mode, file and Free sources will be disabled.
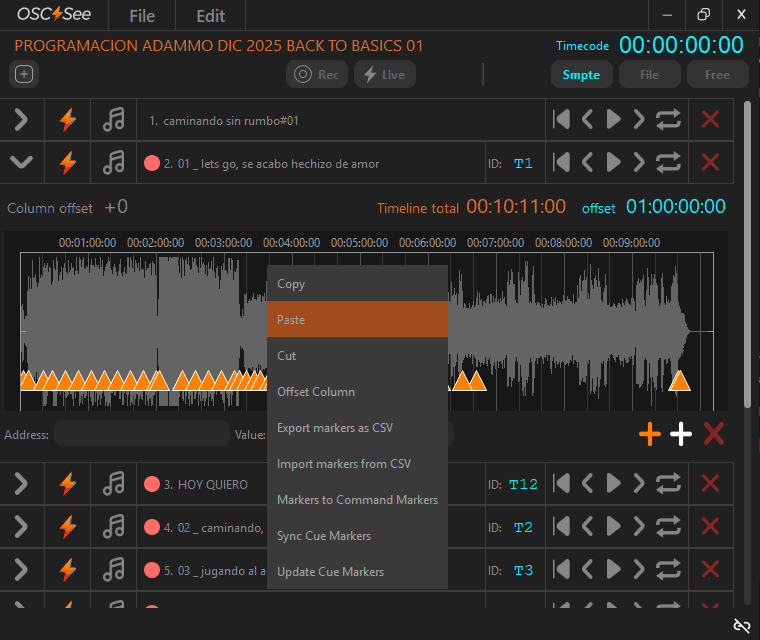
Context Menu (Right-Click) – Timeline Editing Options
This section describes all functions available when right-clicking on the timeline in OSC⚡See. These options provide advanced tools to edit, reorganize, synchronize, and exchange marker and command data efficiently.
Please refer to the Right Click Options section for a full guidance.
Command Markers+ Traffic Light
Pre-flight check
Verify Traffic Light = 🟢 before showtime; 🟡 means missing/duplicate names; 🔴 means not synced or wrong Deck.Multiple targets (Add IP Out)
Send to many destinations: localhost/own IP for local apps, plus LAN IPs—unique IN port per app.Stay focused (Frontmost)
Pin OSC⚡️See on top of other apps to keep transport/status visible during rehearsals and shows.
Note:
Column scanning is performed at controlled intervals to avoid saturating OSC communication with Resolume.
After the initial sync, it is recommended to wait 1–2 minutes for the status to fully stabilize.
Optimizing OSC See Performance on Windows
To improve the performance of OSC See, you can assign it a higher CPU priority using the Windows Task Manager.
Follow these steps:
1️⃣ Open Task Manager
You can open it using one of these methods:
Press Ctrl + Shift + Esc
Right-click the taskbar → Task Manager
Press Ctrl + Alt + Delete → Task Manager
If it opens in compact mode, click "More details".
2️⃣ Go to the "Details" Tab
At the top of the window, select:
Details
This tab shows all active system processes.
3️⃣ Locate the OSC See Process
Look for the process named:
(The name may vary slightly depending on your installed version.)
4️⃣ Set the Priority
Right-click on OSCSee.exe
Select "Set priority"
Choose:
High (recommended)
Realtime (only for dedicated show systems and advanced users)
When Windows displays a warning, confirm by clicking Change priority.
Technical Recommendation for Live Shows
For maximum stability in professional environments:
Close browsers and unnecessary applications.
Temporarily disable antivirus during the show.
Set Windows Power Plan to High performance.
Disable automatic updates during events.
If possible, use a computer dedicated exclusively to OSC See.
Important note:
Process priority must be set each time OSC See is restarted, as Windows does not permanently save this setting.
Quick load of project without audio files
If your project does not require audio playback, you can significantly reduce project loading time by temporarily removing the audio files from their original folder path.
When OSC⚡️See opens a project, it attempts to locate and load all referenced audio files. This process can introduce a noticeable delay, especially with large audio files or slow storage devices.
Tip:
Before opening the project, move the folder containing the audio files to a different location (or disconnect the drive where they are stored).
OSC⚡️See will skip audio loading and open the project immediately, preserving all OSC programming, tracks, markers, and Command-Markers+.
This workflow is especially useful for:
SMPTE-driven shows where audio playback is handled externally
Programming-only sessions
Quick edits or last-minute adjustments during rehearsals or live setups
Once audio playback is needed again, simply restore the audio files to their original path and reopen the project.
Many of these items are also explained in the main manual sections—they’re repeated here for quick recall.